Showing posts with label quilting. Show all posts

A mini finish

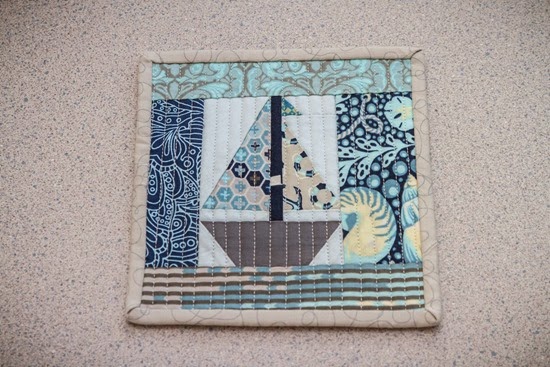
Last week it was my Mother in laws birthday. I decided somewhat last minute I should make her a little something. I decided to try the mini swoon pattern by Thimble and Blossoms. I only made one. I figured it would be a good mug rug or trivet since it is about 8”.

This baby swoon took almost as long as the Mama swoon block. So don’t be deceived by its size. So needless to say my MIL didn’t get her present quite as early in the day as expected. I am not too sure of the fabric line used here but I did pair it with Kona bone and also used bone as the binding. She was pretty happy with it. I had to make something for the lady who taught me how to chain piece when I was a super newbie to the quilting world ;)

12245971304_7aefe88c3e

Thanks for stopping by!

linking to finish up friday at crazy mom quilts

Mr. Fox

I was lucky to be able to take part in the Flickr Doll Quilt Swap round 14. I had so much fun being snoopy and trying to figure out what my partner would like. I was inspired and decided to with a design that was a little more fun than serious.

I was inspired by Pile O’Fabrics cross stitch block tutorial. This little block could be turned into so many cute designs. I had a vision of a little fox made with all different orange fabrics. I had one problem though there was no way I had 39 different orange prints. Luckily some lovely ladies (locally and not so locally) donated some of their orange scraps to my vision which helped me to create the most handsome Mr.Fox ever! Okay maybe I am bias. He also has 10 different low volume prints and 4 text prints mixed in with those 39 prints, that is a lot of fabric for a little quilt.

 10989608604_6a357822a5_o

You might notice that my blocks are a little smaller than the tutorial. I used 1.5” squares and 4ish” by 1.5” strip. The linen was about 1.75 (I left it the original size in the tutorial). I squared them off to 2 3/8” so sewn they are approx 1.75”. This quilt ended up being 20” by 19.5”  for some reason it isn’t quite square. Oh well.

11734415075_1ed14e62c0_o

I decided to hand quilt because I didn’t want the quilting to take away from the design. I used an Aurifil orange variegated thread in 28wt. 

11734419565_c14204ab8c

I even made my very first ever label. Sure it was just with a Sharpie and Heat n Bond but I am proud of myself, lol.

11734425915_7f48597d55 

This quilt will be heading to its new home in a little bit. I have loved making it. I hope he makes you smile :) Everything came together so nicely and I really really hope my partner loves him!

Linking to Needle and Thread Thursday and Finish it up Friday

My Dad’s Quilt

Back in July my Dad was in a pretty bad motorcycle accident. Luckily he is alive but sadly he is still a bit broken and still not back at work. After his accident he would basically make me feel guilty every time I saw him by asking me where his quilt was since my Mom had gotten one while she was in the hospital only a few months prior. (you can read see hers here if you want.) Anyhow every time I would respond with oh sure Dad I will make you a 6” quilt to keep your toes warm. We would tease each other that is just how we roll in our family. In October I finally decided I would make my Dad his quilt after he landed himself in the hospital for a unwelcomed stay once again. Now he even had more leverage being there twice I guess. My brother pitched in a little cash and I went fabric shopping!

So I made him his quilt for Christmas. He didn’t know about it. We surprised him!  Well at first he unwrapped a blu-ray telling him to go to the laundry room where his 6” quilt was waiting for him…

11554515256_2b2a6f9f8d_b11555580913_dc9bb1be7c_b

He started laughing so hard. He was thrilled with his little mug rug. He even said that would have been good enough but wasn’t willing to give his actual quilt up to my brother. Afterwards I unrolled his big quilt for him. I used the Vintage pattern from the Simply Retro by Camille Roskelley book. I did not add the additional borders (My Dad is not the tallest guy, ssshhhhh). This quilt measures at approx. 60” by 80”.11468553474_18b66ed424_b

My Dad has a thing for sailboats. So I had to add a sailboat block. I think that it turned out well. I used the lovely Tula Pink Salt Water line in the blue color way with a few Kona solids thrown in. I paired it was Kona ash and the binding is the anchor print. I couldn’t really make a block with that print because it blended so much but luckily I found yardage on sale for binding! I quilted it on the angle stopping at the sailboat block. I stitched around the sailboat which was easier said than done with my sewing machine.

11468686343_9fedbaa5e2_b 

Needless to say my Dad is very happy with his quilt! I am super glad that I made the time to make it for him even though Miss L thought I should be making her quilt instead. Hers is on the list.

11555632786_6d13919b2c_b 

Happy New Year to all my lovely blog friends! I hope we all have a few fun me projects planned for the new year!

WIP and a little finish

December is the month of lots of sewing but not much blogging. Some of my family read my blog so their projects are off limits for blogging at the moment…

I can show you some little things I have been up too though. I am taking part in the Doll Quilt Swap on Flickr, which I am super super excited about! I snooped and then snooped some more and then came up with a cross stitched fox for my partner. I was lacking some orange but some lovely ladies helped me out with some extras! I love this community! Here is a progress shot. I am hoping he will be very handsome!

11209007436_d424d29e83 

I still have a lot of blocks to sew but so far so good ;) I used Pile O’Fabrics cross-stitch block tutorial but it is a little modified because I needed the blocks a little smaller. I am trying to figure out his ear tips and eye though. Should the eyes be the same print? how about his ears? hmmmm. What do you think?

My little finish is some sweet dumpling pouches. I decided to give Quilt As You Go a try! I have to say that QAYG is a lot of fun. I thought these would make a great “just because” gifts. Although I had to “fix” up one (darn a couple little holes caused by unpicking. I put the zip in upside down, oops) so my sister is getting my damaged goods ;)

11209010156_81a04c7624

I really enjoyed making these. You can find the pattern for these here. I used the harder pattern which is about 4” along the bottom.

11208996404_d989cb0fbf

Linking to WiP Wednesday at Freshly Pieced and Needle and Thread Thursday at My Quilt Infatuation

Orbit Quilt Finished!

So the quilt is done! I made all of my finish goals. I got it done for last saturday to post on IG for the #westwoodacresgiveaway (which I happened to win and won this awesome bundle from Amanda, so excited! You should check out her shop), I got it done before Jason’s birthday and before the VMQG meeting!  I was not able to show it there because we ran out of time. That is alright because we were all amazed with seeing all the beautiful and awesome neon cotton couture challenge projects. You can check out the challenge pieces here at the VMQG Flickr group! And of course I got it done before the end of the month for my a Lovely Year of Finishes goal.

10972414785_cd07360929_b

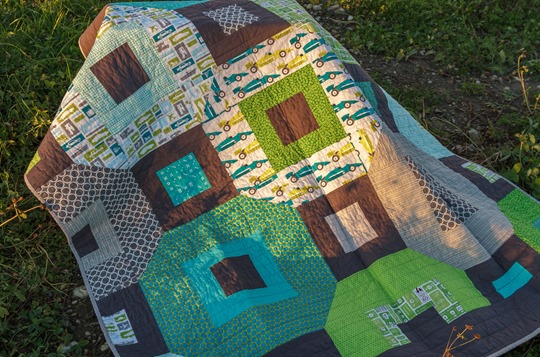
Anyhow this quilt was made for my brother. The pattern is found at LRstitched and is called Orbit. This is a Quilt Along pattern from earlier in the year. I really enjoyed making this quilt. The pattern includes an awesome coloring sheet to help with planning, cutting and sewing. I was surprised on how quickly it went together! I quilted this quilt in straight lines.

  10972572024_1bd3dfdbeb_b 10972626593_52f31b2768_b

I used a variety of prints that I collected based on the colors on the center Robert Kaufmann race car print. The solid I used was Kona charcoal. The backing was the IKEA texted print with a strip of leftovers on the side since it wasn’t quite wide enough. I also added a strip to the top and bottom to add a little length for a tall boy.

 10972423955_06a2268011_b 

He is happy with his quilt and is now teasing all my other siblings that he has a quilt and they don’t. (I am the oldest of six kids so I may be making some more sibling quilts) He is an awesome guy who helps my parents, our siblings and me out however he can. I am glad I was able to make him this Thank you quilt and that he is my brother!

10972544336_caff66b181_b

linking to Needle and Thread Thursday, Finish it up Friday and A Lovely Year of Finishes

A Bunch of Crosses

I have been on a roll in the past little while with sewing projects from my books. This time I was feeling a little down and needed a pick me up, a “selfish sewing” project! I decided to make a pillow for our living room with the few Amy Butler Cameo prints that I had. I pulled out Pillow Pop and found Katy’s pattern for “a bunch of crosses” happened to required the exact number of prints that I had. So I went with it. So glad that I did.

10593308743_3ff69c2edc

I have to say that I haven’t made a 2.5” patchwork project yet. It was a little finicky but completely worth it! I am glad that I had seen and read a lot of tips on matching up seams on such little squares. I really enjoyed making this pillow. I love how green and pretty it is! I quilted in straight lines with a light silver Aurifil thread #2600 which blended perfectly.

That blue print reminds me of my Grandma. She use to live in a house with a sitting room in the front entry. It was called the blue room. She had wall paper with drawings of people in blue, blue carpet, couches with blue flowers…I think you get the idea. I use to have piano lessons in that room. Oh the memories.

10593063096_1ecb3396de

This pillow measures at about 20” It is sitting on our loaner couch right now… we really need to go buy a couch! A comfy couch! I do look forward to making a few more Amy Butler pillows with some of my pretty fabric stash. I sure missed out on a few lines though since I have come late to the quilting scene, lol. Oh well.

10593033685_42561903fb

linking to Needle and Thread Thursday and Finish up Friday

A Sliced Four Patch Quilt

Guess what?! I actually used one of my quilting books again! Some days I am accused of not using them. When I bought  Modern Designs for Classic Quilts I really wanted to try the sliced four patch quilt pattern. So when I found out that a friend was having a baby soon I thought it was a perfect chance to make it!  (Especially since she was so sweet to me when I was having my first baby!)

_DP_9961

This quilt reminded me of my very first quilt that I started, a disappearing nine patch. (which sat on the rocking chair and now keeps me warmer on my side of the bed until I get my chopsticks quilt made) Making this baby quilt helped me see how much I have grown and learned since April 2012. That I can actually call myself a quilter, lol. That matching points do get me excited!

_DP_9966

Although the book said to square these off at 10.5 inches that was not possible. Perhaps my seams weren’t scant enough. (I do use a 1/4” foot.) I squared them off at 10” instead. Leaving this quilt to measure at an approx. 37.5” square

_DP_9963

It is backed in some more dots! I think that this quilt has a dot and transportation theme to it! You will see some more of these fabrics in another quilt soon!

_DP_9965

I hope that this quilt sees a lot of tummy time and cuddle time. I am super thrilled with how it turned out. (So is my husband. I love it when he likes what I make!) Plus it was fun to make!

Linking to Needle and Thread Thursday at My Quilt Infatuation and Finish it up Friday at crazy mom quilts.

Flying Geese for Laura!

Secret project finally revealed!!! It is so hard to keep a secret…

My brain went crazy trying to figure out in what direction I was going for Laura’s sewing machine cover. I changed my mind a few times and then dove in! I decided to make some flying geese. I hadn’t made them before so I went with the paper foundation technique to make sure there were perfect points!

I first made these strip pieces pulling as many fabrics I had that were favorites. Some Denyse Schmidt, Lizzy House, Anna Maria Horner, Joel Dewberry (Okay maybe that is one of mine) Architextures, and more.

IMG_20130814_162418

I then printed out this template to make the front or back well one side of the cover. I paired it with Robert Kaufman Linen in Putty. It took some time to do but was totally worth the effort! If you have this on your list you should try this pattern out. I think it would be awesome as a pillow!

_DP_9600

I decided make a box on the other side. I printed out this template but shrunk it down some. This was a little trickier than I had expected but it is so good to learn new things. I also decided to not do all the geese in the strips but add one in each direction.

(pardon the bubbly bottoms my machine is a little short…)

_DP_9601

The little left overs became a border. I ordered a new Denyse Schmidt Florence print for the binding. I wanted to go with something a little darker. I even snuck in a fussy cut from Memoirs of  “little” since Laura’s blog is called little and lots.  I thought it was kinda perfect!

_DP_9607

Thank you so much for swapping with me Laura, it was so lovely making something for such a talented lady! I hope this makes your “sewing space” a little happier.

My Lilly Belle Quilt

Well I have to say that I am still in shock that I actually completed this quilt! I only started it almost 7 months ago… I was on a mission to not take any unfinished projects with me as we move. Trust me I have a list of projects that I want to start but they will have to wait!

I finished this quilt top back in January but really really wanted to Free Motion Quilt it. I decided to do a few smaller projects and practice. As I practiced I received some tips and encouragement.

First tip I got was from Krista over at Poppyprint. She directed me over to her tutorial on Flickr for spray basting. She said it was easier to FMQ with out having to worry about pins and the stress of the quilt shifting. I am totally sold on this method although I still pick and choose which projects to use the can of 505 on since it is not cheap.

Second tip was to wear gloves. At first I wasn’t a believer but then I tried and trust me it helped big time especially with a big quilt.

Third tip put music on. It will help you get into the flow of it.

Fourth check your set up. Are you too high? Too low? I was complaining about sore wrists and the lovely Felicity over at Felicity Quilts advised me to check my set up. (She has awesome FMQ skills) I have to say after tucking a few pillows under my bum it was sooooo much better.

I have to say my FMQ skills are not perfect by any means but I am super proud of this quilt.

This is my handsome and adorable quilt holding assistant. He was complaining about the size of this quilt while demonstrating how he had to hold it up… I love him. I am glad he supports me in my crazy sewing projects.

This is as straight as it got… Sadly the last quilt in front of this old shed… Happy to be moving soon though.

I used the Belle Wave quilt pattern by Faith over as Fresh Lemon Quilts. Yes I know I copied her down to the fabric but I was lucky enough to win this FQ bundle and I wanted a quilt! Although I made a few extra blocks six to be exact because I made an oops. I think it was the best oops because now I have a big quilt to snuggle under. I also changed the directions of the waves.

This quilt measures at about 60” by 75”. There are 8 prints from the Lilly Belle collection by Bari J. plus one Tula Pink called Sprout from Parisville and one Amy Butler called Martini in mustard from Midwest Modern. The solid is Kona Bone from Pink Castle fabrics. It is quilted in Aurifil #2026 which matches perfectly! The binding is Joel Dewberry’s herringbone print. Backing is a Henry Glass quilt backing print.

Linking to Let’s Get Acquainted at June and Plum and Fabric Tuesday at Quilt Story and Sew Cute Tuesday at Better off Thread also Finish it up Friday at Crazy Mom Quilts

Posy Quilt

It has been a quilt top for a while but over the weekend I finished this sweet quilt up! Miss E’s posy quilt or as she calls it her bunny blanket is all ready to cuddle with. She is willing to share pictures of it but don’t you even think about touching it…

This quilt is made with a pattern by Allison over at Cluck Cluck Sew called Inside Out. I modified it slightly by adding the left over pieces from the charm squares as a border and put the middle plus print at the ends instead of making them scrappy. The fabric is Posy by Aneela Hoey. I used charm packs and some bunny yardage for the inside pluses!

It is her bunny blanket because she LOVES bunnies! She tries to count all the little bunnies running in the pluses. I decided to use a print instead of a solid like the pattern suggests. It makes it busier but I wanted to feature those darling bunnies! (Although lately she says elephants are her favorite, silly girl)

I am also proud to announce that I actually free motioned a quilt! I did loops with my trusty Aurifil thread plus my gardening atlas grip gloves. (Thanks Cathy for the tip!) It is the only free motioning I know how to do, lol, I need more practice! You might ask if it was tricky with the minky backing. It wasn’t but I have to say it is because of the spray basting.(I used 505 spray adhesive) I would never attempt this with pins. Minky just stretches and pulls too much but she won’t sleep without a soft blanket. It washed up so nicely! Perfect for snuggling!

This quilt is bound with a crosshatch print from Blooms and Bursts by Jen Da Silva that I found at a local quilt store. All put together makes a happy little girl…

…and a cute bed! All ready to sleep. If you are wondering this is a Ikea adjustable bed at the smallest setting. The quilt fits pretty well just a little bit too narrow that doesn’t really matter though.

With the added borders the quilt measures at approx. 38” by 43 1/2”. Now to maybe finish up my last WiP before we move! Fingers crossed!

Linking to Let’s get Acquainted at Sewing by Moonlight and Fabric Tuesday at Quilt Story

Baby Strip Quilt

I guess those around me will benefit from my quilting obsession. I kinda feel bad that I have cousins and other family members/friends that I have not make baby quilts for but I just wasn’t into quilting then…

This baby quilt was not hard and no I didn’t practice my Free Motion Quilting. I should have but quick straight lines were quicker. I need to start packing and stop sewing. Although I am still going to try to sneak another WIP in before the end of the month. However when I look at the calendar that might not happen… we will see…

So I took my yardage (I had some 1/4 and 1/2 yards) and cut random width strips and sewed them together. Those rows are straight really it was just the wind.

_DP_6849

This line was called Tutti Frutti from Timeless Treasures and I mixed in another couple dots and some Kona white. It is quilted 1/4” away from each seam with some Aurifil thread.

_DP_6850

This fabric was one of my first just because it was cute purchases. I was thinking of making quilt for one of my girls with it but then I won the Simply Color Layer Cake and Miss L like that better. I love those little pears! I had bought enough for the backing of a baby quilt.

_DP_6851

I think that this quilt is an awesome spring/summer baby quilt. I hope it is enjoyed by the new parents and their little princess. It measures at approx. 33 by 38 inches.

Linking to Finish it up Friday at Crazy Mom Quilts

My brother is better than yours…

…well it is true. I have the sweetest and most awesome brother who spoils me once and a while. He bought me fabric for my birthday that was in April. Not just any fabric a Fat Quarter bundle of 12 Anna Maria Horner Field Study prints! Plus some 1/2 yards of Amy Butler Alchemy prints. He loves me! I should really start on his quilt I plan on making him I have all the supplies…

Anyhow my FQ bundle came and I had to make something with it ASAP! I happened to buy some AMH Field Study yardage plus a Bari J print from her Splendor 1920 line that went perfectly for my birthday as part of my bday gift from my husband. So I had 13 prints to play with and went on a search for a pattern.

I found a pattern on Cluck, Cluck, Sew called Squares and Strips. A patchwork quilt! I have never done a 16 patch or a framed patch so I decided that this was perfect. Quick, easy, and something that I could use my FQ bundle with. Perfect!

_DP_6740

This top only took me a few days to complete but then I was on a stand still until I found the perfect thread to quilt with. Well I found it at the quilt show last weekend! Aurifil #5022 came to the rescue. I had brought my pouch that Miss L had made with me to color match.

IMG_20130623_140328

I quilted it with curves most of them with a curved frame excepted for the framed blocks those ones got an orange peel type petal. I used my walking foot and I didn’t mark where I was quilting so it is far from perfect but I am not too worried about it.

_DP_6755

I am in love with this quilt and I love the fact that there is a quilt in this house that finally belongs to me!!!!!!

With the yardage I even had enough for the backing and binding! This truly is a birthday fabric quilt!

Okay I will stop with the pictures already… Hope everyone has a great week!

linking to

Let’s Get Acquainted at Quilts in the Queue

Fresh Sewing Day at Lily’s Quilts

Fabric Tuesday at Quilt Story

Science Fair Quilt

My husband and I are building a house with his parents. It has been a long process and they say we will be moving soon, we will see, lol. Through it all my sister in law Kelli and her husband Jeff have been there to help design, consult and put some labor in. They are both architects and are amazing at what they do. When I saw Architextures I knew they had to have it in their house. When I was on the search for a pattern and came across Jaybird quilts Science Fair pattern I knew it was meant to be. It just suited them. The perfect thank you gift. I thought so and my Mother in Law thought so too. So we went ahead about bought the fabric.

I had a small hiccup when my jelly roll was 1/8 of an inch too narrow but we decided to shrink down the template and it worked perfectly. In the end the quilt is about 2 1/2 inches smaller in width and length. (Not a huge deal.)

I really enjoyed making this quilt. It was actually pretty quick and came together nicely. I finished it by quilting on an angle randomly spaced.

I ordered some yardage for the backing. I wanted to make the backing scrappy since the prints are so pieced within the quilt top.

I was happy with the results of making bias binding for the first time. It went in and out of those concaved angles perfectly. 

Linking to finish it up friday at crazy mom quilts and Friday Felicities at Felicity Quilts

Back to Home Back to Top Making Life Prettier. Theme ligneous by pure-essence.net. Bloggerized by Chica Blogger.